Tuesday, June 03, 2025

Adventures in Model Building

First, apologies for the last blog post. I have no idea what I ate or smoked before I wrote it but it was a weird one. 

Ok, so as I mentioned before I am trying to get back into model building. I'm forty years out of it and have a lot of up-tooling and up-skilling to do. In the last six months or so I've probably spent about $700 to $800 adding knives, adhesives, sanding tools, tweezers, paints, vises, magnifiers, primers, varnishes, and kits to the stash and I've still not gotten an airbrush, which I'm told will change everything.

But I did start with a few of the kits I've gotten and here are my updates.

Meng Models: Titanic

The first kit was a great beginner kit. The Meng Models snap together Titanic kit with colored parts can be built with no glue and no paint. It also has a light kit. My great nephew really loved working on it with me and getting to share his excitement and joy was and is priceless. It's one of the underrated powers of modeling, which many use as a solitary activity for therapy, but can also be used to build memories with others.

That kit went up fast because there was no prep of a workspace or paints. There was no cleanup of paints. There was no having to set up a place near ventilation because there were no glues or paints needed. It was great, and I wish there were more kits like this, designed to be easy to start and easy to finish and that still look good when done. It would help a lot of people get into the hobby. I've heard Bandai's Star Wars Snowspeeder kit is like this: it snaps together, has great fitment, lots of detail, sprues molded in color, and stickers that can add some color. Unfortunately I think it's not in print anymore.

The Meng Titanic wasn't cheap (it was about $50 during a Sprue Brothers Lighting Deal, which means about $100 MSRP) but except for having to handle some very small parts, it was a good kit and the good times I shared with my great nephew are priceless.

Pegasus: Spitfire Mk. I

Interested in getting another kit my great nephew and I could work on, I opted for the snap together Spitfire kit from Pegasus. It's a decent kit for a $12 snap together. It has some nice detail in the panel lining, and a small number of parts limits the complexity. However, it is molded in only one color so we couldn't really start it yet since it will need some painting to be presentable. And as primer and paint work sort of require a partial build of the kit first, it may end up being one that I just build and then give him to display.

I do like the kit though. Obviously it's not going to have the cockpit detail of higher-end kits, but it is a very nice low cost kit. If you're ok with not painting, you can build it in probably 15 minutes. And if you want to put some effort into it, it forms a good test bed for other techniques. You can add riveting to the existing panel line detail, add your own detail to the cockpit (though I doubt any after market parts are available for this kit), and of course a good paint job can add a healthy soul to even the most basic of kits.

This one is currently in progress as I'd like to wait until I have the airbrush to paint it.

Monogram: 1976 Datsun 280Z

This one is personal. In 1976, I was nine years old, and my father bought a Datsun 280Z 2+2. I remember all the neighbors coming over to take a look at it. The Z car's legend is pretty commonplace now, but back then, it had come out as the sports car that everyone could afford. It was very simple with an in-line six cylinder engine and looked a little bit like a Jaguar. TV's Bionic Woman drove one.

My father drove that Z for several years but about 1985, he moved to using the VW Vanagon that we had. It was the perfect time; after all I was getting ready to head to college and what teenager in America doesn't want to have a car?

I would drive that 280Z until about 1990. I had graduated from college and had my first job and would eventually move on to the 1990 300ZX, but that's a story for a different day and a different model. Back then, it was the 280Z that took me to college every day. I went with the Z to visit my friend at UC Santa Barbara, to the San Diego Comic Con, and had a small accident (technically my fault but aided significantly by poor driving on the part of the other person!), but it kept going until I sold it. It had served me and my family faithfully for fourteen years. And except for occasional hassles it was pretty reliable; not bad for a production sports car.

I want to build one as a memento to that past, and found out that there are indeed model kits of the Z car. Unfortunately, there are very few 280Z kits, much less one for the 1976 edition. There are many Z kits still in print, from the 240Z to the 350Z, but the 76 280Z is rare. It does exist; Monogram made one and released several variants between 1976 and 1984-ish but they're hard to find. You can find old Heller or Revell kits online and they're cheap because people know the quality is shit. But the Monogram Z must be in demand because I had to pay an inflated price for the one I found on eBay and it's not a great kit by modern standards.

There are seam lines in spots on the body, sub-optimal fitment on the front end of the car where it connects to the body, and other quirks of a plastic model produced in 1976. It will require work to really make it nice; though it's certainly a serviceable kit and faithful enough to the Z shape and image. I could not find a 2+2 model, so I am making do with the standard coupe. 

I have started sanding areas that need work on the body.

  • There are seam lines down the C-pillar from the roof to the body
  • The front of the car (grille and headlights) is a piece that has to be affixed to the front of the body and needs sanding
  • The body has sharp angles in places where the Z that I remembered had softer curves. I'm sanding the top of the fenders on both the front and back to restore the appearance I remember. The bottom of the back of the car has the same problem so I'll try to soften those edges too.
 There are several customizations I have to apply to this build.

  • The front bumper of my 280Z had two features not on the kit:
    • There were two small rubber blocks on each side of the center. I will have to find some way to make these, perhaps with putty. A couple of the Monogram variants have these so if I can find one for a reasonable price that would be a great way to solve the problem. There's one on eBay now, but the bitch wants $70+ for it and I just can't endorse that valuation. 
    • Mounted on the front bumper's two rubber blocks was a little grill guard rail. That's not on my Monogram kit or any of the other versions of the Monogram kits. I do have reference pictures of other American Z's with this feature, so I figure I can cut and bend a piece of sprue to simulate this and mount it on two other flattened pieces of sprue.
  • The rear bumper had a raised rail that went the length of the bumper. I should be able to simulate this the same way I do the grill guard. 
  • The chrome mag wheels that come with the kit are nothing like the wheels on my Z. I could not find third-party replicas of the same wheels but I did find something close. That's amazing, back when I was modeling as a kid, you could not just jump online and find an alternative 3D printed part. The parts are from the Ukraine, and they're very good quality but I learned the hard way how brittle resin parts are and broke one of them while test fitting. Not too badly though, and I've already painted the wheels silver and they are going to work fine.
I am not doing to try and recreate the 2+2 variant of the Z. No way, not with the skills and tools I have now. That would involve stretching out or extending the body and chassis and probably reworking the rear window frame and window. No thanks, I do not have time for that. 

So far I got the body built. I need to paint the body and interior in order to finish up the build. The Z was silver originally but after a few years the Japanese paint deteriorated badly and my parents had the car repainted in white. I will paint it white to represent the years I had it.

This will be a good kit for practice as I didn't build many car models before. I'm learning a lot. I got a can of Testor's Extreme Lacquer White Lighting which I thought would be an easy way to paint since Extreme Lacquer is billed as a primer, paint, and sealer all in one. But testing it out on a piece of sprue first, I found it goes on thick and the humidity of Houston makes it dry slowly so it tends to drip off a bit. I've since learned that in humid locales you paint in the morning before it gets warmer. I also am beginning to wonder if spray painting will cut it. Maybe it would in a different clime, but I wonder if I'm better off using a primer first, something good like a Mr. Base Coat or Mr. Surfacer or a Tamiya white primer, then airbrushing a gloss white. In fact, I was reading some threads on the internet where one guy said he had luck just using a bright white primer, then adding gloss afterwards. Nothing else, just the primer and the gloss coat. 

Not sure yet what I will do here, but I do know if I'm going to stick with the spray paint, it'll have to be in the mornings, with a good paint booth, and in several light coats. But I have to do this one right. The kit is hard to find so if I mess it up it's hard to recover and start over. It's not like an F-4 Phantom kit that you can find in every hobby shop and garage sale. And it means something to me. I'll make it nice, put it in a display case, and cherish it. 

Monogram: A-10 Thunderbolt II (1/48 scale)
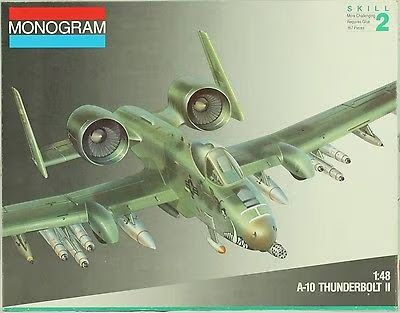
Ah, my old friend Monogram again. This is one of the kits that came in a bundle of kits and paints I bought through OfferUp and got me kickstarted back into modeling. I had originally considered selling it since I prefer 1/72 scale, but as the box was already open I figured it would be a cheap kit for more practice. Monogram bills it as a skill level 2 kit, so it is considered easy.

Skill Level 2? MORE LIKE SKILL LEVEL 5! This old 1991 beast from a 1986 molding is a total bite in the ass. I had read in some modeling threads that people think this is a good kit. They have to be kidding me. It's awful. Raised panel lines, poor fitment, and bad design decisions abound here. The guys saying it's a good kit must be referring to accuracy rather than construction quality (there are other 48th scale kits available that are criticized for errors, so that could be it). 

Ye gods. After recognizing the poor fit of the engine parts during dry fitting, I again considered selling it. At a low price, someone else would certainly buy it and I could be rid of the kit's hassles. But I had my glue and workspace set up and just said, "oh, just go for it and you'll have a ready paint mule."

So I continued. I spent about six hours so far on it (better than half that time spent sanding, OMG, this kit). I started some of the assembly for sections that didn't need the fuselage (I hadn't painted the cockpit yet). The engine nacelles are poorly designed. There is a cylindrical piece to show the front of the engine's nose cone and blades and it's hard to know exactly the best way to fit it. You sort of have to just hope that when the top of the nacelle is put on it'll look ok since you can't manipulate it much once you glue the top piece in. The rear of the engine also has problems. There is a piece to mount near the back that serves as a place to glue on the rear engine directional nozzles, but the fitment is very weak and after it was all done my two engine nozzles aren't perfectly aligned. Paint mule. 

I did see these build reports online from these guys:

Most of them found the same problems I mentioned (except for Roberto, who I think was too kind to it). Young and Hodges did mostly out of box builds except for a few changes. Hui did an amazing job, upgrading several parts and scratch modifying the kit's open speed brakes into closed position. The kit really should have made that an option on the brakes (open or closed). It was a strange design decision not to do this.

Hui's build really inspired me to consider saving this paint mule and make it at least presentable. At this point I have to paint and build the cockpit before I can finish the construction. After that I have to decide if I want to go grey or green camo for the paint. 

The kit does have a few high points. First, although I just said the designers should have made the speed brake position an option, providing an open one is very interesting. I think that wasn't that common a thing to show back then. Lots of kits just have a single molded wing; flaps up, end of story. Second, the cockpit detail isn't up to third party upgrade standards, but it isn't awful, especially for a 1986 molding. The overall shape and look of the kit is good and several online have praised the kit for being more accurate than the competition, which makes it a worthy build even with its problems. Finally, the array of included ordnance is formidable. In some kits today you sort of have to go buy third party add-on weapons if you want to have a plane that's ready to ride dirty. Not so with this Thunderbolt II, although the fit on those bombs and missiles will indeed need some work (more sanding!). 

I think in the end it was a good choice to build this one. It caused me to go find Aaron Skinner's video on how to scribe panel lines so I now have a plan to replace this kit's raised panel lines. That may come in handy if I ever run across another classic kit that needs such work.

UStar: 1/144 Soviet T54 MBT

Well, here's something completely different. I have not built many armor kits. But I saw this on sale the other day and figured for a few bucks it wouldn't hurt. There's a growing community around the 144 scale, and with today's manufacturing capabilities, these models are showing up with a respectable level of detail. Plus, it's more practice.

I started this kit today and after spending just a couple hours I'm almost done with construction, but during that time I oscillated between saying "I love you, little 144 kit," and "I hate you, little 144 kit". 

The love comes from the cuteness of seeing this tiny tank you can fit in half your palm. And the quick build of a small kit that has only two small sprues and a photo etch(!) sheet. And from seeing such neat detail on such a kit this small. 

The hate comes from having to work with tiny parts with old failing eyes. Putting the turret's spotlights and machine gun on was an absolute bear. I'm getting nightmares about the photo etch parts that still need to be done. The kit has a few flaws too; there's some flash on a few parts although it's not a lot. A pronounced seam line mars the middle of both tracks. Where light sanding can fix that on some models, I think these track seams must be very deep because sanding and scribing hasn't fully removed them.  Cleaning up flaws on these tiny parts is also tougher than working on the 1/48 A-10's parts.

This will make for a good paint practice though. I can experiment with some of the washes and filters. It'll be easy to store too. And if you want to make dioramas, 144 scale makes it easier to do large scale battles. 

This kit is an experiment and a learning exercise, but it's opening up some ideas and I can see why people like the scale. 

Other Thoughts

So I'm kicking off with a bang and have several projects in the works. Some of them will stall until I get an airbrush; I thought about just hand brushing the first few but then figured, why spend the money on regular paints and spray paints when I will use the airbrush anyway? To be sure, I think any modeler still used mixed styles (brush, airbrush, and spray), but so much of what I've heard is the airbrush is a huge difference maker. While it will take extra time to learn how to use it, and each use requires some setup and cleanup, I think it will make several parts of painting much easier and produce better results. 

I'll have more thoughts on airbrushing later, but in the meantime I've having fun watching thin cement go to work with capillary action, and discovering the joys of sanding. I know, I know, I bitched about sanding in my discussion of the Monogram A-10 kit, but sanding really is quite therapeutic. It doesn't require expensive tools, a laborious setup, or take much time, but you get nearly instant gratification. It's very satisfying to dry fit some parts, see where there are imperfections, and gradually create a perfect fit with just some sanding. I'm particularly intrigued by the use of super-fine grit paper (10,000 and higher) that can be used to polish glass and plastic. 

It's both fun and work, and I can see why lots of people use modeling for therapy (although there can be frustrating moments too). I think I'll have fun with this for a good ten years before I quit to save my eyes. That's the one thing that's noticeably worse this time around; when I was a kid I didn't need magnifiers. Now? I'll have three or four different magnifier devices before I'm done!

Monday, May 26, 2025

Annual Memorial Day Post: Strange New World

This year I didn't really have a plan for the Memorial Day post. I thought I might share thoughts on my adventure to fix a ceiling fan, yet another example of how we cater to the disposable society instead of making it easy to keep existing things alive. But then I thought about how the world's been changing and think maybe it would be more appropriate to ask whether the sacrifice made by our veterans has been  truly appreciated or not.

I don't mean superficial things like saying "thank you for your service," which I'm sure is quite tired and doesn't really do much for veterans anymore (even though they probably do appreciate that you mean well), or making sure you have a flag displayed today or on other honorific holidays.

I mean do you act meaningfully in ways that respect the sacrifice? Not just things on one day, but every day. It can be big things like donating to veterans causes, or simple things like just taking a daily moment to appreciate what you have, rather than worry about how much more your neighbor has. It can be not taking for granted that you have free speech by making sure you have thought through what you want to say rather than wasting it by blathering something to be insulting or hurtful (Harlan Ellison used to say, "You don't have the right to an opinion, you have the right to an informed opinion."). 

Are we making the world in a way that shows we're thankful for it? People are so politically polarized now, and perhaps they always were, but today it seems so many say things just to put others down. Especially in the realm of social media, where people speak by keyboard and they're protected by distance. This deterioration of civility finds its way into other parts of life. I'm not an environmental extremist, but I do care about the environment; I think the earth is a gift to us and we should not so cavalierly pollute it. Even in personal health, there are indications that we're poisoning ourselves with processed foods and insecticides and plastics. The people that have the power to change this aren't using their freedom to do it.

Is this the world our veterans wanted us to build? 

You can be cheeky and say it's the natural order of things. The young today all immediately waggle a finger and say "late stage capitalism," but I'm not sure that's fair. It's not like any other government system was free of issues, and some of the worst were ones that specifically tried to be different from capitalism, then succumbed to the same things that dogs both types: corruption and stupidity.

I've noted before that freedom is a double-edged sword; you can do what you want but so can the bad guy. The law is supposed to be the protection against that, in a society where we accept that what we really want is managed freedom. But the extremes on either end don't like that; they want it their way and only their way and anyone getting in the way isn't worth talking to. It leads to selfish and absolutist behavior that doesn't portend well for the direction humanity seems to be headed.

If you believe in the concept of Pandora's Box, and feel we've opened that trunk and kicked it several times over, then we're indeed walking each day into a strange new world. This direction might not be reversible. Are we throwing it all away on the road to apocalypse? Because that's what happens if the road is one-way; if you can't go back you can only go with adjustments in forward direction. Significant change may only come as a result of disaster; cataclysmic rather than gradual evolution. 

If that sounds biblical, it's because it is. I used to poke fun at things like prophesy and myth but when I look around, I'm beginning to wonder if there's something to it. Humanity's descent into chaos is indeed a prediction shared by both the Bible and The Simpsons. If you believe that, then perhaps it's actually liberating rather than concerning, because it means things are going swimmingly. Just hang on and hope you can cash out the 401k and die peacefully before it gets really bad. Happy Memorial Day!

Sunday, May 11, 2025

Something I'd like to Teach my Son

So I've got a child that is a college graduate. But he's struggling to find a job in his area of study. Part of it is that he's probably got some maturing left to do and may not be carrying himself in interviews as a hungry prospect, but also academics wasn't his strong suit so the grades weren't great, and while grades mean less as you progress in your life, they are the only thing to go on for your first job. 

But I have been pondering how to communicate to him that work is just work and it doesn't really matter if you get a job in your college subject or not. It started me thinking about the concepts of labor and jobs. 

Factors include the skill you have and the things you're good at and the things you're not so good at. And  also the jobs available, and which ones you want and which you don't want. Your work life is about getting into some intersection of those things and navigating them.

I drew a Venn diagram to illustrate this.


What does it mean?

  1. Star: This type of job is the typical goal. You have a skill, you're good at it, and there's an available job that lets you do what you like. Sadly, many of us don't get here until we retire. That's right, we take the not-so-fun job that pays well, and then when we retire, we start taking the hobby we like (painting, woodworking, gardening, cars, whatever!) and manage to turn that into a revenue stream. I think the problem is that often enough, those hobbies aren't really viable for a living wage unless you're really good or really lucky, so you don't try it until you don't need the money and are mentally liberated to take risks. That's a big talking point from the Universal Basic Income camp, but I think there's still a fair amount of bullshit in that argument because the odds of making it as an actor or artist or dog walker are still pretty low.
  2. Plodder: This is where a lot of people end up. There are jobs available, it's something people think they want, but perhaps they don't realize they're not actually the most talented at it or perhaps they're not really that passionate about it. They're not bad at it and are competent enough to keep employed. I call this the plodder because they're going through the motions and doing OK, but either they're ignorant of the fact they could be better, or they're self-aware of it but caught in the inertia of a job that pays well enough that they kid ourselves into thinking they want it when they'd really be happier somewhere else. 
  3. Caution: This is where people want a job, there are some available, but they're actually bad at it. Perhaps they're in an industry where there is a constant need for help, so they have no trouble finding work even though advancement never seems to happen for them, or worse, they get advanced due to circumstance and not merit. Teaching could be a good example; some teachers are clearly better than others, but these days as long as you're not an ex-con, you can be an idiot and get a teaching job because I'm not sure how much the administrators really care. 
  4. Hope: This is where you want a job for a skill you do well, but there aren't any available. Your strategy here is to take what you can to sustain yourself, but keep looking for opportunities to move.
  5. Delusion: This is where you want a job, there aren't any available, and you're not good at it. Bestselling writer, actor, and professional athlete would qualify as these types of jobs. Everybody wants it because of the money or prestige, but most aren't good enough or lucky enough, barriers to entry are high, and there are few opportunities. 
  6. Safety Valve: This is where some of us end up too. There's a job you're good at and there are plenty of jobs available, but they're not the jobs you want. I think of the guy I knew that wanted to work in tech, but had a job in food services. He was really good at that job, but he wanted to get to the Star job. This is not a terrible place to be. It's actually second place on this list of labor types. He made good money and was stable and his workplace loved him. Often the difference between jobs in this category and those in the Star category is that they use different skill sets, but it doesn't always have to be that way. Sometimes jobs that are adjacent in an industry can represent this divide, such as an application developer versus a database administrator. 
  7. Desperation: The worst labor scenario. There are plenty of jobs available, but you don't want them, and you're bad at them too. You only take this job if you're unable to find any of the other job types. And if things are this bad, perhaps you'd better learn to get better at this job and convert it into a Safety Valve job because if you don't you might get kicked out anyway.
This is not a conclusive list, I'm not a professional labor analyst, and as I've said before, any categorization is just a starting point for discussion. Categories are too rigid for cases where someone may be moving from one to another, and there can be different degrees of state in each one.  

I do think the diagram can help people looking to be more cognizant of what their desires are against what is available and be ready to adjust expectations or prepare to take a fallback role. Nothing is written in stone; you might have a great job in the star category for a company that might go out of business or transfer work offshore, or you might be in a safety valve job and then either a better job opens up to you or you come to grips with the fact that aren't going to find the star or delusional job, so you come to recognize where you are is actually a great spot for you.

Thursday, February 27, 2025

Thoughts on Globus Tours

In 2012 I took my family on our first European vacation. Before that we didn't really have the money for it but in 2010 I went contracting and was able to mass enough savings to spend on the trip and reward my spouse for being patient while I saved for it. 

I planned the entire thing myself months in advance. Tours, hotels, transportation, the whole bit. It was a blast doing it and then seeing it all come to life. Granted, it was also a lot of work, but it was fun work. Thanks to the internet, there is no shortage of reviews and I was able to put together a nice trip. We flew to London and had an overnight layover there, which I combined with a day tour of the city. Then we flew to Rome, did a half-day tour, then hopped on a cruise ship that took us to parts of Italy, Greece, and Turkey. At each stop I used either the cruise company's excursions or private tours that I booked on my own. Upon the cruise's conclusion, I combined the transfer from the port to the airport with another day tour that visited some lakes and castles. It was a packed vacation and we had a great time.

Well, the spouse got the travel bug and most years after that we did a trip. Our passports picked up stamps from Spain, Costa Rica, Croatia, Mexico, Taiwan, and Hong Kong. Thanks to contracting, I was able to do it while still making the mortgage. Except for Covid-19, where we took a year or two to do staycations. But each trip was a lot of work to plan.

Last year was the first time we did things differently. We had a travel agent take care of most of the planning by setting us up with a group tour with Globus [globusjourneys.com]. It was the Taste of Portugal trip, that spent a week visiting the north, central, and south areas of Portugal. 


Pros

  • I didn't have to think too hard once all the paperwork was done. The travel agent took care of arranging our flights and transfers. I didn't have to scour TripAdvisor and other sites looking for the best tours or hotels. There is some value in the peace of mind in handing it over to someone else.
  • I didn't have to think too hard during the trip either. Similar to taking a cruise, most of the cost is borne up front. Once you're in the hands of Globus, you're on a pretty set schedule. You're not completely off the hook; Globus takes care of transportation and lodging during the tour, as well as opening and closing night dinners, and each hotel typically includes a complimentary breakfast buffet. You will be responsible for your own lunches, dinners on the remaining evenings, and any extra excursions you want to take. So I still had to do some planning to pick out things to do during afternoon free time and to find good restaurants.
  • The guides they select are generally pretty good. They're multilingual and know the regions you're traveling in. 
  • Globus has been doing it a while, and they're pretty well organized. Communications are good; you'll get a steady stream of emails leading up to the departure day to remind you of what documents you need done and what you can do to prepare. Once the trip starts, you don't get much though, and some integration of the guide's notes and itinerary into a daily digest email would be kind of nice.

Cons

  • Globus is in it to make money, as any good business should be. But some of their strategies broke down under duress, and you as the customer may feel it. I suspect Globus locks in costs by setting up long-term contracts with local providers such as hotels, restaurants, and local guides. That's smart and a good business strategy. But it affected our vacation in a couple ways; read on.
    • You're set in the hotels you'll stay in. When I planned it myself, I could go cheaper or more expensive depending on the situation. If I just needed a clean, safe place to stay for a single night in-transit to another destination, I could go with something simple. Why pay for a five star set of amenities if you won't have time to use them? Globus put us up in decent hotels during the trip, so it's not a big deal, but if you're into min/maxing costs, you don't get a say here.
    • The restaurants were where it made a bigger difference. The first dinner was at the same hotel where we were staying. This was a convenient and decent option that yielded a serviceable if not extravagant meal. But the final dinner was in a venue that I think they originally hoped would be special and it turned out to be less so. It was a fair drive from our regular hotel and we had to walk part way due to construction. Then the elevator access was limited and people had to wait a long time to get to the venue. It was at the top of a building and we were supposed to enjoy the view but the delays in getting everyone there meant we didn't all get to see it. This was in 2024, and while Globus had a contracted price, the restaurant was probably feeling the pinch of post-Covid inflation; it was clear they were cutting corners on the meal. Our options were fish or lamb, and the fish approached the thinness of the "meat" on a White Castle burger, and the lamb didn't look or taste like lamb. I can understand the restaurant's dilemma, but suffice to say, quite a disappointing last meal.
    • We traveled from Porto to Agueda to Coimbra on the morning of the third day of the trip. Then on the fourth day, we traveled nearly halfway back to Porto to visit a winery in the morning. Wine before noon? Yes, but it's vacation, so whatever. Again, this stuff is probably locked in in advance, so you get what you get. If I'd been planning, I'd have gone to the winery around lunch time after Agueda and maybe arranged for heavier snacks to go with the wine tastings, then gotten into Coimbra in the late afternoon. The fourth morning could then be dedicated to a proper tour, and Coimbra was actually really cool, there were some neat things to see there that weren't formally part of the agenda that in my opinion should have been. Most of the time in Coimbra we were on our own.
    • The final days in Lisbon were spent visiting three smaller towns. Each one had some charm and they were all worthy visits, but the last one, Cascais, was really beautiful and we only got an hour or two there. Would have liked more time at that one. 
  • One size fits all. In case you couldn't tell from the above points, the tour has to be pretty generic since 30+ people of all ages and backgrounds are brought together for the trip. The daily format is typically this and doesn't deviate much:
    • Breakfast at hotel
    • Guided tour or event in the morning
    • Free time declared starting at lunch. You're typically on your own for lunch, afternoon activities, and dinner. There are optional excursions hosted by Globus if you want to purchase them. On this particular trip the excursions didn't really grab us so we walked the city and found good restaurants to visit. 
There's nothing wrong with that but if you're used to tailoring things to the preferences of your family, you're out of luck unless you do some of your own planning in advance.
  • The old joke says, "Hell is other people," but the people in a group tour can be both a blessing and a curse. When you throw 30+ strangers together on a bus, you're bound to come across someone that doesn't see eye-to-eye with you. Most of our crew was great, we met some nice people and had a good time. There was one guy that was quite vocal and complained about some things, and there were some who had mobility limits and probably wouldn't have been very good on high-adventure vacations, but none of that took away from our enjoyment.

Summary

Would I use Globus again? Yes, if I was in a situation where I wanted to just chill and let someone else to most of the planning (although with Globus you're still responsible for planning your afternoons and evenings.). It is kind of nice to pay a lump sum up front and not have to worry too much about most of the trip. But if I have the time, I'd prefer to plan it. In some spots it will be more expensive but I also can compensate for that by adjusting the lodging and events, and I can choose where I want to spend more, for example on a particular activity or restaurant. 

Wednesday, January 22, 2025

A Return to Scale Modeling

I lamented in a past post my hobbies that take up time, money, and space, namely book collecting. Welp, I'm about to make it worse. 

A Forty-Year Absence

I built scale model kits when I was a kid and probably haven't touched a model since my sophomore year in high school. That would make it about forty years since I was involved in the hobby. 

I didn't make a quick, conscious decision to get back in. It was something that sort of came to me indirectly while collecting the Squadron Signal books. In the course of researching Squadron, I learned about how the company has changed hands and is being revitalized by Brandon Lowe. I started to listen to the Wednesday night YouTube show "Squadron Live" and after seeing such beautiful work done by other visitors to the show and from various scale model pictures on facebook and other sites, I became inspired. 

How Things Have Changed

To say the least, since I was last involved, the hobby has evolved. Kits are more detailed and more expensive. The glues have changed and there are many different types. Paints have evolved too, and acrylics are very common now as a safer alternative to enamels. And tools for everything from painting to sanding to supplies storage and more have changed. Although not the most expensive pursuit, it's not exactly cheap. 

But I was amazed mostly at how popular modeling is. You hear so much now about how youth these days don't get outside or do activities besides video games. But there are droves of people doing it; some are like me and getting back in, others never left, and new modelers are coming in all the time. I liken modeling to the comics industry, where the materials became a bit more of a niche and more expensive, but the audiences got older and often richer, and this disposable income allowed them to keep up with the hobby.

There was one more bit of inspiration. Decades ago when I was still just dating my current spouse, she got me an aircraft model for my birthday, and, get this, a Squadron book to go with it. Then for my birthday last year, she got me another one. Over all this time I never built the first one but I made it a goal to eventually get to it. Now that we're going empty nest, this is the time. 

My goals are simple: I'm not going to try to be those guys that make the absolutely incredible dioramas, at least not yet. I'd like in the next couple years to be able to reconnect with the hobby, get my tools and skills in order, and put together a kit or two a year. When I'm ready, I've got some ideas for dioramas I'd like to do, but I won't beat myself up too much if I don't get to them because they look like they would take too much time. But if I can get a few kits together and make respectable kits I can display in the house that would be great. I initially wondered, how much was it going to cost?

You can Go Back again, if you're Willing to Pay

I was fortunate enough to be able to kick start my re-entry by finding a guy on OfferUp that was letting go of his paints and kits because he's in the place I was twenty-five years ago with kids on the way and no time or money for modeling. I bought the whole bundle and then took stock of it. There were a couple of 1/72 scale planes that were the key for me, and a couple planes in other scales. There were also a few funny car kits, some Warhammer 40K space marine sets, and some boats. I'm not going to use the space marines or cars, so I sold those off and I've nearly recovered all the money I spent on the bundle in the first place. What I have left are a few kits and a bunch of paints that were effectively free. 

Then of course I had to go ruin a good thing and buy a bunch of kits during the Hobby Lobby 40% off model kits sale, and then I got hooked on the Lightning Deals at the Sprue Brothers online store and the Squadron holiday sale late last year. So now I'm a couple hundred bucks in and I still need to get an airbrush. I'm also interested in the new Scale Color paints Squadron is coming out with, so perhaps I'll sell off the paints I got in the bundle too. It'll be the first time I've used an airbrush so I'm looking forward to picking up this new skill.

A Bunch to Do 

It's crazy how the hobby has changed. When I was a kid, I didn't primer my models. I pretty much just glued them together, and sometimes I painted right on the kit afterward. The old adage says if you had fun then your build was successful. Well then, I guess I did ok. 

But now you do some variation of this sequence: wash the parts. dry the parts, build, add photo etched parts, primer, pre-shade, apply base paint color, mask, paint patterns or camoflage, mask again, paint the canopy frame, mask again, maybe build a bit more and add accoutrements, apply a gloss coat, apply decals, apply matte coat, apply panel wash (weathering), apply more weathering, de-mask, and you might finally be done.

And the chemistry involved! Styrene plastic is still the main ingredient in most kits, but you may also have resin parts that were 3D printed, or metal photo etched parts that add extra detail. So you may have multiple types of glue in a build for the different materials, and special types of glue for clear parts. Same for paints, where you might have acrylics, enamels, lacquers, different clear coats, and more.

I have a lot to learn, but it's all pretty cool. Onward.

Monday, January 20, 2025

Review: EcoViva Reverse Osmosis 600G system

Where I live, the city water is pretty crummy. Tap water rates 200+ on the total dissolved solids meter, and it smells and tastes like chlorine. It's poor quality water to drink and to bathe in, although I suppose it is disinfected and will kill you slowly rather than quickly.

The Brondell Circle: Great Concept, Poor Execution

For the last six years I've been using an ingenious product: the under-sink reverse osmosis water filtration system. These have been around a while actually, and I had one in my old house, but over time the technology has continuously improved and now they're smaller and easier to use than ever.

My first system was from Rainsoft; the salesman was a pompous, insulting ass and I should have never bought from him, but I really liked the idea of drinking cleaner water. It was a three chamber system with storage tank, installed in a rack on the side of the under-sink cabinet. It would filter water into a holding tank that kept a cache of about two liters of water. It was a decent system but involved cumbersome maintenance. You had to backwash the filters every so often, replacement filters were not cheap, and you also had to use a compressor to recharge a bladder inside the storage tank so that it would push water to the sink spigot. 

At my current home the sink came with a Dupure two chamber system, but it was ass. It was basically a taste and smell filter that only weakly removed the chlorine smell and the water still tasted like crap. I did a lot of research and settled on the Brondell Circle system. I was really excited about the Brondell at first. It was not cheap but it featured improvements over the Rainsoft. It contained all the equipment in a single assembly. Inside a box about a foot tall, a foot and a half deep, and about nine inches wide, it integrated four filters and a storage tank. It also self-backwashed with each use so you didn't have to do that chore manually. 

Unfortunately, the Brondell had some serious design flaws. About a year and a half into its life, some of the valves ceased to work right and the output dropped to a trickle. It would work ok after each filter change for a few days and then would return to a super slow output. It was maddening because there seemed to be no fix for it. Online, the truth about the Brondell would come out and many customers would complain about this happening. We lived with this deficiency for the last few years by having a pitcher or a large lemonade dispenser by the sink that we'd fill and then use that for drinking water as needed, and refill it as needed. Refills took a long time but once you were done you had water for a couple days. Still, this was inconvenient and I went from being a Brondell fan to a Brondell hater. Further, the Brondell filters weren't cheap and there was no recycling program for the old filters, so each refill created three to four plastic cylinders that went to the landfill. And from a product out of California...for shame!

Recently the Brondell sprung a leak and started dripping water everywhere. Rather than try to fix it I decided it was time to be rid of it. Like so many poorly implemented products before it, it was time to  let it go, and feel blessed to be in an economy that encourages competition. Looking online, I found many other directions I could go.

EcoViva: Benefits of Evolution

There were lots of the Rainsoft-style traditional systems, with the wall mounted rack of filter chambers and separate storage tank. But what was cool to see were that there were now also many new RO filter systems that were tankless. Tankless would mean less space needed under the sink, which is important because my sink area is cramped, but moreover, many of these newer systems were smaller even without tanks. One of them, the EcoViva WP-RO-600G-W, is the one I ended up choosing.

So how does it work? The EcoViva and others like it swap a storage tank for a small electric pump integrated into the unit. That's the one big difference and drawback from the other systems; you have to have power connected to the unit. The pump accelerates the flow of the water through the system and alleviates the need for a storage tank to provide a ready supply of filtered water. 

There are other benefits too: the EcoViva is more efficient. The Brondell created more than two gallons of wastewater for each gallon of filtered water (although Brondell's marketing material claims that is more efficient than other traditional systems). The EcoViva flips that equation and delivers two gallons of filtered water with a gallon of wastewater. It also uses fewer replacement objects when you change the filters. The front of the unit has two cylindrical chambers; in each you have a filter unit, one is the sediment and carbon filter, the other is the RO chamber. You can easily twist each cylinder a quarter-turn to unlock it, then pull it out and replace it in moments. To be fair, the Brondell Circle's filters were similarly easy to replace. The EcoViva's filters are a little cheaper than the Brondell units, and the system itself costs about half what Brondell charges for the Circle.

So far so good. I've been running with the EcoViva for a couple weeks and it's really nice not having to take up counter space with an extra pitcher or punch dispenser. And the idea that it's more efficient than the former system is comforting. I'll update here if the EcoViva doesn't hold up. Happy to be getting rid of the Brondell.

Tuesday, December 24, 2024

Comparison: Squadron Signal F-14 Tomcat "in action" books

Squadron Signal's F-14 Tomcat in action books

The Grumman F-14 Tomcat didn't need a movie to make it one of the most beloved aircraft in US Navy history. Anyone that likes aviation could fall in love with its looks. It featured a rakish profile, often accompanied by colorful squadron plumage on the twin vertical tails.

Squadron Signal Publications liked the jet enough to make five books (to date) about it in the "in action" series. We'll take a quick look at these books with collector's notes on which ones best fit your needs.

1977 - Starting in Afterburner 

The story of these books starts in 1977 with book 1032, F-14 Tomcat in action. It's a beautiful debut for the Tomcats in this line, with a sparkling clean Tomcat of the VF-84 Jolly Rogers squadron, set against a blue sky and launching an AIM-54 Phoenix missile. 

This was the perfect squadron to start with. The Jolly Rogers have an illustrious history. They also have one of the most photogenic squadron emblems in the skull and crossbones. Besides going back to WWII, the squadron's birds also featured in several movies (The Final Countdown, The Philadelphia Experiment, Executive Decision). This was also the motif used in the Japanese animation series Macross (converted to Robotech in the United States), proving the universal nature of the appeal. Although VF-84 was disestablished in 1995, the navy kept the iconic skull and crossbones alive, transferring the logo and name to VFA-103, formerly known as the Sluggers.

Lou Drendel authored and illustrated the first F-14 Tomcat in action book. I'll cut right to it: the book is highly recommended. Yes, even with the books that would follow, Drendel's 1977 entry is the most unique of the bunch and a stellar example of how good the early "in action" books could be before they started to favor graphics over text. 

Drendel starts at the beginning in the book's introduction, touching briefly on the navy's realization that the F-111B was not going to work for them, and then heads into the first chapter to cover flight testing of the then new Tomcat. This chapter is fantastic and captures the words of LCDR Emory Brown. I can't speak for all aviation fans but listening to pilot testimonials is one of my favorite aviation-related activities. Brown goes for several pages, with great photos of early Tomcat test flights. There are also some technical drawings of things like the Tomcat's hard points and onboard cannon. One picture is of General Daniel "Chappie" James after an orientation flight in the Tomcat (James is featured a bit in the Robin Olds biography, Fighter Pilot, and though he was in the air force at the time, he was commander of NORAD later in his career, explaining how he got to ride a navy airplane). 

The next section is a joy to read too. Drendel puts in a page on the Tomcat vs Phantom air combat trials, and that stuff, though short, is candy for military aviation fans. The next few pages include nice cutaway drawings, yet again very cool stuff absent from the later Tomcat "in action" books. 

Following that is a mini-walkaround photo page, then diagrams of the pilot and NFO (naval flight officer, the radar operator in the back seat) instrument panels, an ejection sequence diagram, and ordnance configuration diagrams. 

Early "in action" books were printed in black and white, with a centerfold color insert featuring profiles of the subject aircraft in different insignia. The 1977 book has the color insert but it is split between squadron profiles and some color photos. 

Next briefly covers the Tomcat's introduction to the fleet, followed by featuring many photos of the F-14 in carrier operations. 

The next section is just awesome, as Drendel details his experience in a check flight in the back seat of a Tomcat. Several photos accompany this section and also fill out the last few pages of the book before readers are treated to another pair of great Drendel Tomcat paintings on the back cover.

Don't be put off by the vintage status of the 1977 book. For an aviation enthusiast, it might be the best one of the bunch. Drendel did a lot of research and work for this one and it shows.

1990 - New Update, New Author

Book 1105 F-14 Tomcat in action came out thirteen years after Drendel's book and also after the Tomcat had appeared in several movies, including one about the Navy Fighter Weapons School at Miramar, California...the name of the movie escapes me, but rumor is it was popular. 

The names behind this book are different. The author, Al Adcock, has written other Squadron books about naval aviation, so that's not a surprise. This time around, the artist is Don Greer. Greer and Drendel were the two heavy hitter artists for most of Squadron's history prior to 2022. 

Adcock had more than a decade's worth of material to work through in building this second "in action" Tomcat book. The introduction is new, written in a more professional style than Drendel's folksy narration, and is a bit more detailed in describing the history of the F-14's creation.

The course of the book follows the standard "in action" practice of stepping through each version of an aircraft's variants in chronological order. I'm happy to report that Adcock's book still features a good blend of photos and lots of text. The F-14A gets many pages of the jet flying or on carriers, interspersed with detail diagrams featuring things like ordnance, refueling probe, cannon, the Tomcat's chin electronics pods.

The color centerfold features just squadron jets in profile. 

The next section is more meaty material for military history fans, covering the Tomcat's combat record at the time. This is primarily the 1981 Gulf of Sidra incident. 

Adcock then dedicates a couple pages to the export of Tomcats to Iran before covering the F-14B and F-14C and advanced experimental variants, along with material on the NASA F-14 and finally the F-14D.

Both the 1977 and 1990 editions are fifty pages.

2007 - Drendel and Greer team-up Issue

Book 1206 F-14 Tomcat in action would appear seventeen years after Adcock's entry, and shortly after the retirement of the F-14 by the US Navy on 22-Sep-2006. Lou Drendel returned as the author. Interestingly, Don Greer provides the painted cover and Drendel the title page. Mike McMahon, the publisher at the time, wrote of the two long-tenured Squadron contributors in the front notes, explaining that with the F-14's retirement, he felt Greer's use of a Tomcat with a sunset made for an appropriate cover. The winner is the reader, who gets yet two more great paintings from these Squadron stalwarts.

This book is also what McMahon called the debut of the All Color In Action series, where the photos in the book are mostly color. 

In addition to an introduction page, this book also has an author's foreword page. Drendel acknowledges the 1977 book and reviews how the Tomcat has seen changes and fame since then, and how the end of the Soviet Union took away the adversary the Tomcat was made to intercept, how the Tomcat found new life as a strike aircraft, and when it made its final catapult launch. His love for the plane is clear.

The formal introduction that follows is similar to the 1977 book's introduction, though Drendel reworked it with a more formal style. 

The F-14A starts the usual survey of the plane's variants. While there is some overlap in the general material, the text here reads very differently than Adcock's F-14A introduction page. Drendel also includes more details on the various manufacturing blocks of the Tomcat and adds a list of BuNos for each block. 

The color photos are great, and like the 1977 edition, this book includes diagrams of the instrument panels for both pilot and RIO (radar intercept officer). But this edition's color, larger pictures, and larger print all work to make these parts more readable than the original. This is a nice improvement.

Drendel continues to track the Tomcat variants and BuNo ranges for each. The pictures and paintings are an awesome sight and a real treat for Tomcat fans. The book ends with sections on Tomcat weapons and the Tomcat as a bombing platform. The final page shows Tomcats being dismantled at Davis-Monthan Air Force Base, the famous airplane graveyard. Drendel provides two paintings on the back cover. 

On one hand, it's sad to not see some inclusion of the material from LCDR Emory Brown's testing and Drendel's recollections of his Tomcat ride, but on the other, there's minimal duplication of content between the 1977 and 2007 books. 

Book 1206 weighs in at fifty-two pages.

2018 - David Doyle and the Coffee Table Book Format

Book 10206 F-14 Tomcat In Action would appear eleven years after book 1206. The book numbering, 10206 versus 1206, seemed to be a quasi-standard Squadron was using to number books that were updates to previous books on the same aircraft.  

The good: 

  • Most of the photos are in color and Squadron bumped up the page count to eighty.
  • Doyle packs in a lot of photos, and from Squadron TV I've learned he takes great effort to not reuse photos from previous books. There are some great pictures here, including one of a Tomcat still flying after receiving collision damage.
The not as good:
  • This is one of the books where the entire book is mostly photos and captions. Still great stuff, but you're not going to get that great detail from pilot interviews. The photo captions are still good and can add useful detail.
  • No Drendel or Greer artwork. Both covers and all interior graphics are photos or diagrams. 
I joke about "coffee table book format" but of course I still love the books, it's just different and I kind of get how Doyle simply couldn't be as prolific if the books were in the old format. It would take much longer to get all that data, in addition to scouring over all the photos and curating to avoid duplication.

Book 10206 clocks in at eighty pages.
 

2022 - A little later, a little Update


Book 10267 F-14 Tomcat In Action didn't wait long after the last book to show up, just four years this time. These four years were tumultuous for Squadron as it went through period of near dormancy, the pandemic, and ownership changes. 10267's numbering also is odd, as it is an update to 10206 with an additional eight pages.

I've mixed opinions on this one but the first impression is a good one, with a new artist's work gracing the cover. Now under the ownership of Brandon Lowe, Squadron is getting great digital art made by Piotr Forkasiewicz. There's an episode of Squadron TV  featuring Forkasiewicz [YouTube] where Forkasiewicz tells his story and gives a glimpse into his art process. Although the digital art can reduce some of the inefficiencies of traditional art (it's a lot cleaner not having to clean up paints, and 3D models make creating reproductions and variations much easier) it's still a ton of work.

It's interesting to note too that the indicia shows the copyright goes to David Doyle instead of Squadron. I've said in an earlier post what a smart move by Doyle that is. Traditionally the publisher gets everything and the writer gets very little in the contract rights (unless you were willing to fight for it like the scrappy Harlan Ellison, but for most of us that would mean not getting published). Not sure though if this was just a one-off special case due to the Squadron ownership changes. 

Outside of the cover, title page, and indicia page, book 10267 is identical to book 10206 through the first forty-five pages. In 10267, page 45 features the photo that was book 10206's cover. Although the picture is a lovely shot of a Tomcat with wings forward over the water, I like 10206's page 45 featuring three photos of Tomcats in service (a pair of Tomcats on a carrier deck, an F-14 catapult launch, and a Tomcat in profile in flight in low-visibility paint). 

The books re-sync for pages 46 through 62. 

Then on page 63 there's some weirdness. Both books sport a four-picture quadrant spread, and both have the same pictures in the top two quadrants. Book 10206 does something really cool; it shows in the bottom pictures Tomcats of the VF-41 "Black Aces" in a refueling op. The bottom left Tomcat is in low visibility paint, the bottom right picture shows a Tomcat with the brighter colors and red in the squadron tail markings. Both photos are from 1991, the left Tomcat is number 104, and the right is number 101. There's a story to be told here, but Doyle doesn't tell it! Why during the same time frame are these two Tomcats painted differently? Is 101 a CAG bird, which were sometimes allowed more colorful schemes? Was 104 more actively involved in combat operations and why it had the more subdued colors?

And it gets weirder. Even without the story behind the two VF-41 birds, the two photos in 10206 are an interesting contrast, enough to spark the questions I ask above. Book 10267 has the same low vis Tomcat picture in the lower left, but swaps out the lower right for a VF-1 plane preparing for a cat launch. Why did Doyle make this change? I'll have to ask someday in a Squadron TV episode. Boy what a nerd I'll look like in that show: "Uh, Mr. Doyle, why on page 63 of book 10267 was the quadrant four picture changed?" Yeah, absolute SNL "get a life" skit fodder.

Page 64 is identical in both books.

Page 65 is a win for book 10206, which features the aforementioned shot of a damaged Tomcat still flying. Book 10267 at this point starts some squadron color profile drawings. While I like the profiles, book 10206's picture is incredible and absent from 10267.

Page 66: Book 10206 has a full page for the same photo that was the curious replacement in the bottom right corner of book 10267's page 63. Despite being smaller in book 10267, the photo color looks better as book 10206's rendition seems slightly tinted.

Page 67: Book 10206 has a triple photo layout, book 10267 has the third page of the color profile drawings. But on 10267's page 68, it starts with the vertical half-page photo used on the right half of the previous book's page 67, and then the second half is the same two photos that make up the first half of book 10206's page 68. Book 10267 loses a shot of a Tomcat on a carrier during Operation Southern Watch. 

Pages 69-74 are identical between the books.

Pages 75-77 are hard to compare. There are some of the same photos used in both books but Doyle has re-sequenced several while also dropping a few of 10206's for other operations photos. One change I liked is of the special "final Tomcat cruise" emblems painted on the Tomcat's last tour (this picture is also in book 1206). 

Book 10206 ends at page 80, but both books have the same last three pages, showing the airplane graveyard and a Tomcat at sunset. 

I remain curious as to how Doyle decided what to keep and what to change, but who am I kidding, it's the Tomcat, so all the pictures are going to be good. 

Book 10267 counts in at eighty-eight pages total. 

Conclusions

If you're a Tomcat fan and can't get enough photos of the Tomcat, you'll love all of these books. And of course, if you're a completist, the advice is the same, get them all because each has something different.

If you're looking to save money and space, I would omit 10206 for 10267. If you're mostly looking for photos, I think 10267 is your top choice for the best selection of color photos, although book 10206 does have a closeup of landing gear and the damaged flight picture, photos dropped for 10267.

If you're a historian, get 1032, the 1977 book that has all the great information about the early days of the Tomcat, and maybe supplement it with Adcock's 1105 to capture some of the operational history.

If you need modeling reference photos for later variants like the F-14D, you'll have to start with Adcock's 1105 or later.

If you can buy only one? Tough call, but I would contend that the first book, 1032, is one of the best in terms of educational value and useful material. None of the other books comes close to providing the same insights into flying the Tomcat. 

Book 1206 is sort of an oddball in the mix. I like it as a sort of farewell to the Tomcat, and as a nice sequel to Drendel's original book 1032. But it doesn't have the original's storytelling, and the subsequent books would have more photos. However, it does have more of those wonderful Drendel paintings. Still a worthy acquisition for Squadron collectors.

If all the above isn't enough, Squadron published yet more Tomcat books. 
  • Book 5006 is part of the short Modern Military Aircraft series. It's a trade paperback dedicated to the F-14.
  • Book 5503 is the F-14 Tomcat Walk Around, featuring a full photo tour around the aircraft
  • Book 6092 is part of the Squadron specials line and another dedicated study of the F-14. How it differs from 5506 is something for a future post.